Popular posts

Sunday 31 May 2015

McCrumpet Plaid!!!!

So, my regular readers (I hope I have some!!!) will know that Monday morning means Crumpet's Nail Tarts 52 week pick n mix challenge.

This week the prompts are Plaid and/or Red, Green and Orange and I decided to do both prompts.


I started with a base of plain red, using my gorgeous Christian Louboutin Rouge Louboutin Polish. For those of you that haven't used this polish before, it is so heavily pigmented that it only needs one coat to get a mani like this (with no top coat needed!!!)


Next, I added green diamonds using Sinful Colours Envy and finally thin freehand cross cross lines using Revlon Sorbet. I finished the mani off with a top coat of my favourite Glisten and Glow HK Girl.

I don't think you'll find this plaid anywhere in the shops, so I have decided to name it after Debbie Crumpet who started the Facebook group - McCrumpet Plaid!!!

Xoxo


Friday 29 May 2015

Wiki'd Nail Challenge - Water Babies

So, last week saw the start of a 10 week challenge called Wiki'd Nail Challenge. Each week there is a random prompt taken from Wikipedia and this week the prompt is Water Babies

Here's the Wikipedia definition 

The Water-Babies, A Fairy Tale for a Land Baby is a children's novel by the Reverend Charles Kingsley, written 1862-63.

I'm ashamed to say I've never read this classic tale and so had to Google some images to try and get some inspiration for the mani. So I googled, then googled again and then googled some more,but my creative juices just weren't  flowing!!! I was beginning to panic a bit so decided to think outside the box. 


This picture caught my eye, mainly because of the colours used but also because of the quote at the bottom by the main character Tom (which just happens to be my eldest sons name!!!)

I have created lots of blue based manis recently so wanted to avoid blue and thought the colours in this photo would work well in a mani.

My first thought was to create a gradient, but again, I have done a lot of these recently (and I hate the clean up part!!!) Then I remembered seeing a mani created using sharpies over a white "undercoat" 


I reached for my son's pencil case and selected 6 sharpies that I thought would work well for the colour scheme I was trying to recreate. 


Next, I painted a white undercoat using Rimmel London White Hot Love. Unfortunately, I was so keen to start colouring on my nails that I forgot to take a photo - but in good "Blue Peter" style - here's one I did earlier!!! 


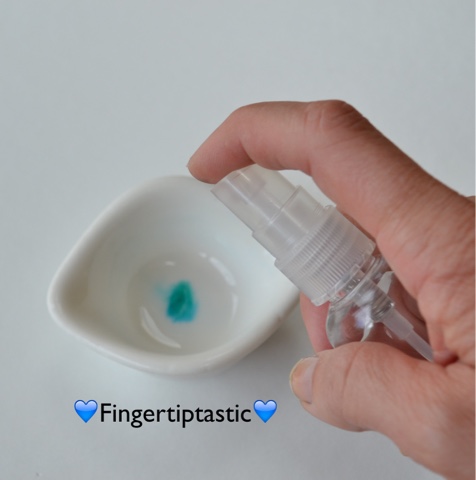
The next stage in the process was to get a small bowl and colour directly onto it with the sharpie (please excuse my naked nails on my right hand!!!)


Once the colour is in the bowl, I sprayed it with alcohol spray (I think perfume would probably work too) The alcohol dissolves the ink from the sharpie, allowing it to be picked up with a small nail art brush.


Here's the result of the sharpie mani after a top coat of Glisten and Glow HK Girl. All it needed now was a bit of nail art to resemble the original photo.


 So here's my mani, complete with Dragon Flies!!! I've created a photo collage with the mani and my nail art so you can compare the two.


Wiki'd Nail challenge - Water Babies

Xoxo


Tuesday 26 May 2015

52 Week Pick n Mix Challenge - Bright & Happy Patchwork!!!

So, it's 52 week pick n mix challenge time again and this weeks prompts are Bright & Happy and/or Patchwork

Before I go any further, I must just apologise for the late post - the Bank Holiday confused me and I spent all day yesterday thinking it was Sunday!!! Hence why my mani wasn't ready to post - I only realised this morning so it's been a quick mani followed by a quick blog - apologies in advance - I won't let it happen again (polished pinkie promise!!!)

With this challenge I usually try to do both prompts so my first task was to select some Bright and Happy colours


What better colours than these gorgeous Rimmel London ones - from left to right the colours are Bestival Blue, Hot Tropicana, Lovey Dovey and Roll in the Grass - think they fit the prompt really well!!!


And here's the second part of the prompt - Patchwork. I finished it off with my favourite Glisten and Glow HK Girl top coat. I love how this mani turned out - even if it is 24 hours late!!!

So, better late than never, here's this week's 52 Week Pick n Mix Challenge- Bright, Happy Patchwork!!!

Xoxo


Monday 25 May 2015

Button Moon - Blast from the Past or Blast Off

So, it's day 3 of the Challenge Your Nailart "Space" themed challenge and today's prompt is Blast Off.

My first thought (and I know this shows my age!!!) was of Mr Spoon in his Baked Bean can rocket , blasting off of Button Moon (it was actually a very slow shaky lift off but with a bit of childlike imagination......) I used to love watching this program and could still sing the theme tune to you now - We're off to Button Moon, we'll follow Mr Spoon, Button Moon, Button Moon (those of a certain age will be humming the tune right now!!!)


So that is where the inspiration came from for my "Blast Off" mani. I've not done a mani before that is a continuous picture over 4 nails and I'm not sure I'd do one again!!! I found it difficult to line my fingers up for the photo!!! I also think I need to work on my the scale of my nailart (I know Button Moon was only a button but even so!!!)

I had a lot of fun creating this mani and reminiscing back to my childhood. Not sure I got the prompt right though - you decide.......
Button Moon - Blast from the Past or Blast Off!!!

Xoxo


Saturday 23 May 2015

What Planet are you from???

So, if you read yesterday's blog, you will know that I'm taking part in a 4 day FB challenge, where the theme is "Space"

Yesterday, the prompt was Space Movie and just in case you missed it, this was my contribution - I'm not a big fan of Space Movies but you've gotta love this little fella - Wall.e!!!


So, now onto today's challenge and the prompt is Planets. Again, this isn't one of my favourite topics and my knowledge of them is very limited (although I can still name them in order of distance from the sun - amazing the things I can remember from my school days!!!)

I was really tempted to use the same background colour as yesterday, as I loved how it looked, but I resisted the temptation to reach for my trusty China Glaze Fairy Dust and instead grabbed my all time favourite "go to" black China Glaze Liquid Leather (I'm not sponsored by China Glaze - I promise!!!!)


I love how shiny and glossy this black is with just one coat (and it's great for nail art too!!!) Talking of which (this is a nail art challenge after all!!!) I decided to keep it simple and stick to a gold and silver theme.


I used Ciate Ladylike Luxe and Opi My Silk Tie to create the stars and planets and then finished the mani off with my favourite "go to" top coat of Glisten and Glow HK Girl.


Outer Space (as you've probably guessed) doesn't really float my boat (or my spaceship for that matter!!) and I don't personally believe there are aliens out there - but what I do sometimes think to myself, especially when someone is behaving strangely, is "what planet are you from???"

Xoxo


Friday 22 May 2015

Where's Wall-e???

So, it's nearing the end of the month, which can only mean it's "Challenge Your Nail Art" time.

This is another challenge group on Facebook that I joined, at the very last minute, at the end of April. Each month the group members vote on a theme - in April the theme was "All Things Blue" - and then prompts are produced on consecutive days for a few days.

These were my contributions for April


 This was April Showers - I used Barry M matte top coat and then, if you look really closely, I added little droplet shapes of Glisten and Glow HK Girl topcoat, to look like raindrops!!!


Next up was Autism Awareness - I googled this and recreated a couple of the images on my middle and ring fingers, using variations on the 4 coloured jigsaw logo that is associated with Autism Awareness (excuse the blurry photo taken on my iPhone!!!)


Finally (it was only a 3 day challenge in April!) was Windy Weather - this was my least favourite mani of the three (so much so that I didn't even post it on Ig!!!) It was supposed to be a wind sock ( I think that's what they are called - like the ones you see near foreign airports!!) being inflated and blown about by the wind. Sadly, I ended up with what looked like The Cat in The Hat passing wind!!! Think this is what's known as a nail fail and not surprisingly, it only got two likes on the FB page!!!

So, after a quick round up of last month's challenge, it's time for this month's theme (drum roll please!!!) - "Space".
It's going to be a 4 day challenge this month, starting with today's prompt which is Space Movie. 

I'm not really a big movie fan, and space movies are probably right up there with my least favourite types of movie, but then I remembered this little chap!!!


Who could help but fall in love with him (as he fell in love with Eve!!!) So, this was the Space Movie I decided to recreate on my nails!!


I started with a base coat of my favourite Glisten and Glow Stuck on Blu and then added one coat of Opi Incognito in Sausalito- I love how shiny this polish is even without a top coat. 


Next up, before starting on the freehand nail art, I added a coat of the gorgeous China Glaze Fairy Dust (which makes an appearance on a high proportion of my manis!!) Apart from loving how it transforms any mani into glitter city - I thought it would give the impression of being deep in space!!! 


And so to the nail art - this photo is the finished article without top coat......


....and you've guessed it - this one has a coat of my favourite "go to" top coat  Glisten and Glow HK Girl. 

So, one down three to go, watch this space (no pun intended!!!) for tomorrow's prompt which is "Planets" and just in case you are anything like my son, look at my index finger before asking - 
Where's Wall-e???

Xoxo

Wednesday 20 May 2015

Crumpets Nail Tarts - 52 week pick n mix challenge

So, I've been a member of the Crumpets Nail Tarts 52 Week Pick n Mix Facebook group for 4 months now and I've completed 16 challenges (we post each week on a Monday)

This challenge differs slightly from some of the others I take part in, both on Facebook and on Instagram, as each week I get 2 prompts. I can choose to do one or other of the prompts or a combination of the two. One of the prompts is usually a colour or a combination of colours and the other prompt is usually a subject or a technique. I tend to try and do a combination of both prompts (as I feel I've taken the easy option if I don't!!!) but having the flexibility to pick and choose means that it doesn't need to take up too much time when time is precious (and in short supply!!).

None of these challenges have appeared on my blog before (no particular reason why - they just haven't!!!) but I've just had an inlinkz lesson with Claire from Kerruticles, so I want to see if I've been a good student and taken in what she taught me (although, I have to say, I did feel as though she was speaking Japenese a few times - don't think she could quite believe how un-tech savvy I am!!)


So, this week's prompts, in the 52 Week Pick n Mix challenge, were Pastels and/or Lilac & Teal. I decided to do a 2 colour gradient using Rimmel London Oh Boy You're So Fine and Essie Mint Candy Apple. I  then added a top coat of China Glaze Fairy Dust (in my opinion there isn't a mani that this gorgeous micro-glitter top coat doesn't enhance!!!). 

Think I'm pushing my luck to claim that I did both prompts this week (though I think mint doesn't come somewhere near teal in the colour spectrum!!!) but I definitely fulfilled the "pastel" part of the challenge.

I do love gradients - despite the clean up that is needed - so here's a few other that I've created this month.


I love that almost any colour combo works and that they look great on their own or with glitter toppers or freehand nail art over them.

Now that I've learnt how to use inlinkz (I hope!!!) I'll be posting more of my mani's that I've created for Crumpets Nail Tarts - 52 week Pick n Mix Challenge

Xoxo


Goodbye A-Z Nails Challenge - Hello Wiki'd Nail Challenge

So, for the last 16 weeks, Thursday has meant one thing - A-Z nails challenge time!!!

This was the first challenge group I joined and although I joined part way through (in my case it was a K-Z nails challenge!!!) I never missed a post and thoroughly enjoyed planning and executing my manis.


Here is a round up of my manis that I created for the various weekly prompts. Some turned out better than others, but overall I was pleased with my contribution to my first ever challenge.

My only regret whilst taking part in this challenge, was my inability to understand how to get my photos onto inlinkz!!! I'm a bit of a technophobe but the lovely Claire Kerr (Kerruticles), who introduced me to this wonderful nail art world, has kindly agreed to give me a lesson in inlinkz (try saying that after a few glasses of prosecco!!!) so that I'm good to go in time for the next challenge. 

Talking of which, sadly the A-Z challenge has now finished, but the good news is that Charlie Smith (pocketmoneypolishes), who created the FB group, has come up with a new 10 week challenge.

It's called Wiki'd Nails Challenge and each week the prompt is a random article from Wikipedia. You can interpret it however you want to, and believe me, the articles are really random - watch this space!!!

This week the prompt is Tattoo - this is the Wikipedia definition

tattoo is a form of body modification, made by inserting indelible ink into the dermis layer of the skin to change the pigment.

So, with this definition in my mind, I set about creating my first Wiki'd Nail Challenge Mani


I don't really like tattoos, so found it quite difficult to find a design that I wanted to use - but then I came across this design and decided to recreate it in a mani.

Whilst I have no desire to get my body modified by inserting indelible ink into the dermis layer of my skin (in other words - I won't be getting this as a tattoo!!!) I do kind of like the design on my nails - far less permanent and far easier to remove!!!

Hopefully, if my inlinkz lesson has been successful, all the other Wiki'd Nail Challengers (is that what we're called???) will be reading my blog and joining me as I say "Goodbye" to the A-Z Nail Art Challenge and "Hello" to Wiki'd Nail Challenge.

Xoxo


Monday 18 May 2015

Staying Focussed

So I've been doing nail art now for the grand total of 4 months and I'd like to think that my manis are improving slowly but surely!!

I have joined lots of nail art challenge groups both on Instagram and Facebook and to date, all my photos of my manis have been taken on my iPhone and then posted on the relevant social media site.

Whilst I don't claim to be a photographer (or a nail artist for that matter!!) I am often disappointed that my photos can appear blurry and they don't really do the mani justice.

I mentioned this to a couple of my Ig followers over the weekend (Miriam @lacquart and @purjoinails) and they very helpfully pointed out that it could be that my iPhone camera is focussing on the polish bottle rather than my nails.

I straight away reached for my little used Nikon D3100, purchased a tripod and set about my next mani. I still don't claim to be a photographer but I was thrilled with the results!!!


The first two photos were taken in daylight and the second two were in artificial light -so not quite as clear and bright but overall I was really impressed with myself!!! So impressed that I decided to give macro shots a go!!!


Think if I'm going to do macro shots in the future then I probably need to give my cuticles some additional love (and oil!!)

Taking the photos on my digital SLR is more time consuming - setting up the camera and tripod, downloading the photos onto my laptop , uploading the photos onto Box and then sharing the link via text message to my phone so that I can post on Ig and FB (please someone tell me if there is a quicker , smarter way of doing this!!) - but it's definitely worth it in my opinion!!!


No more blurry photos like these ones  in future - from now on I'm staying focussed!!!

Xoxo 

Monday 11 May 2015

MoYou Concept Collection Stamping Plates 300 and 309

So, I was lucky enough this week to receive 2 of the new MoYou Concept Collection Plates to review on my blog.


The plates arrived in their own purple presentation pouch alongside a super glossy 2015 catalogue, showing all the lovely MoYou products.

Having flicked through the catalogue I was keen to get started with some manis 


I started with MoYou plate 300 from the new Concept Collection. These plates differ from other MoYou plates as the design covers the whole plate rather than there being a collection of several individual designs. Plate 300 has a musical theme (a guitar, a keyboard,a microphone & musical notes all feature on it) but other designs include stars, stripes and skull & cross bones!!!


Having painted a blue base, I removed the blue protective film from the plate and set to work stamping stars and musical notes in silver. It took some getting used to, using a plate that is completely covered with designs, but I was pleased with the end result. I have fairly small nail beds, so don't have problems getting designs to fully cover my nails, but those with larger or longer nails will welcome the fact that the design just keeps on going!!!


Still using Plate 300 I created a totally different look by using the skull & crossbones design. I chose black and yellow for the mani and took my inspiration from the chemical hazard symbol!!! 


I started by stamping black polish on top of a yellow base on my middle and ring finger, and was really happy with the effect this created.


I then tried doing the reverse and stamping yellow on top on the remaining black nails. The yellow polish I used wasn't a stamping polish, and whilst it stamped well, it wasn't very heavily pigmented so unfortunately doesn't show that well over black!!! 

The remaining designs on this plate were too large to fit on my nubbies but I'm sure the guitar or keyboard would look great on longer nails!!!


Next up was MoYou plate 309, a plate full  of wedding related designs - rings, hearts, roses, champagne glasses and even a wedding cake!!! The large rings in the centre of the plate were too big for my nails but there were plenty of other designs to choose from, so I set about creating my first mani using this plate.


I used a tomato red base and stamped different sections of the plate in black. I was pleased with how the designs transferred onto my nails but wasn't keen on the matte finish of the stamping polish - it just didn't seem to work with the designs!! 


So out came my "go to" top coat and the matte designs immediately became glossy - I much preferred this look but still the mani seemed a bit dis-jointed. I decided that it was the plain gold on my thumb and ring finger that needed attention!!!


A touch of tomato red round the edge of the gold glitter gave the mani a cohesive look (in my opinion!!) and I was finally happy (and ready to move onto the next mani!!!)


I wanted to create a totally different look using the same plate and decided to select specific designs rather than just random parts of the plate. I even managed to just about squeeze the wedding cake on my thumb!!! 

All in all, I was really impressed with these  2 plates, and am now a fan of the continuous design, as it allows so much more creativity.

These Concept Collection plates retail at £4.99 each or you can purchase the complete set of 10 plates for £39.99 & you'll receive 2 free stamping polishes!!! The plates can be ordered direct from the website www.moyounails.com


I look forward to reviewing more of these plates in the future - the Summer themed plate 307 and the Cupid Love themed plate 306 will be next on my wish list - and I'm sure the Halloween plate 304 and Christmas plate 302 will be really popular towards the end of the year!!!

Xoxo