Popular posts

Sunday 26 April 2015

MoYou stamping plate and polish review

So, I was very fortunate this week to receive 2 stamping plates and 2 polishes from MoYou to review on my blog.


The plates I received were 128 (shown on the left and 122. In addition to the 2 polishes California Orange and Blue, I also received a stamper and scraper.

The stamper needed to be primed before it would pick the polish up fully, but once I had rubbed it gently with a magic eraser it behaved beautifully (perhaps I should try the magic eraser on my boys!!)


I got to work straight away and used plate 128 and the blue polish over a three colour gradient. I had to create a "mermaid" mani for an Instagram challenge and thought the fish scale design fitted the bill quite well. The pattern transferred perfectly (even if I do say so myself!!!) and I am definitely a novice when it comes to stamping. I had to work quickly on the clean up as the blue polish is heavily pigmented and could stain the skin if left for too long but overall I was delighted with my first experience of MoYou products


Next up it was the turn of the California Orange Polish and plate 122 - again I stamped over a gradient (2 colour this time!!) and whilst I was pleased with how the polish stamped, I think my choice of colours for the gradient affected the overall result. The peach colour was quite a lot lighter than the Orange of the MoYou polish but you have to look really closely to see the pattern over it.


Not to be beaten, I set about creating another mani using the California Orange. This time I used plate 128 and selected the stripe design. I had a few failed attempts to start with, as I was scraping too hard and scraping the polish away from the relatively bold design. Once I got the hang of it, I was really impressed with how easy it is to stamp lines, rather than messing around with nail vinyls.


Next up, I tried stamping over the striped mani using the Blue polish and some of the other designs from both plates (I even managed to get the MoYou logo on my thumb!!!)


I was totally in the stamping zone by now, so decided to try the orange again but over a different base colour. I wanted to avoid anything orange based and loved the orange and blue together so tried stamping orange over blue - sadly the orange wasn't pigmented enough to show over the darker colour. Back to the drawing board, I selected a light khaki colour (I've always liked orange and khaki together in clothing!!!). I picked a design from plate 122 and was delighted with the result.


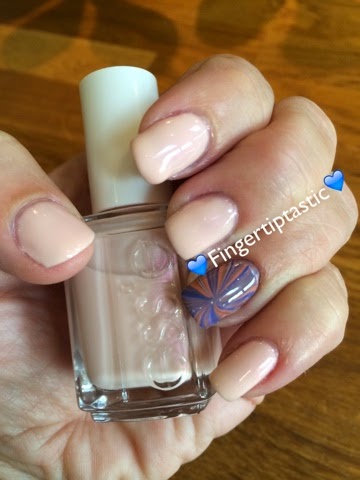
Having focused on the California Orange for so long, I felt I had overlooked the blue. I was still keen to create a blue and orange combo after my previous nail fail stamping orange on blue, so I decided to try it the other way round. I used the California Orange as a base and then stamped the zig zag design from plate 128 over the top - once again I couldn't resist getting the MoYou logo in on my thumb!!! Success - really pleased with the colour combo and overall result.

In short, I loved the stamping plates, the images transferred onto the stamper cleanly and once I'd adjusted my technique for the larger designs (stripes and zig-zags) and didn't scrape all the polish away - I had no problems at all. 
The stamper was a great size for my nails, and once I'd primed it with a magic eraser it behaved beautifully!!!

The MoYou polishes and plates reviewed retail at £4.99 each and can be found at www.moyounails.com


I'm looking forward to reviewing some of MoYou's new collection so watch this space - I will also now be able to post in the MoYou Facebook group at last!!!

Xoxo


Wednesday 22 April 2015

Power Dressing - how it all started!!!

So, with a post title like that, you'd be forgiven for thinking that this blog was all about big shoulder pads, the kind many business women from the eighties were pretty partial to!!!! 

In fact, the Power Dressing that I am referring to is a gorgeous blue polish by Ciate.


This is 3 coats of polish, which gives the mani a really deep colour. It is super glossy and is shown here without a top coat.

In addition to this being such a gorgeous polish, the reason for it featuring on my blog is that it was the colour that set my nail art bug in motion.


My friend Claire Kerr, whose nailart website and blog can be found at www.kerruticles.com, posted this pic on Facebook in January and I loved it. I made a comment about the colour on her timeline and in her incredibly efficient way, she responded with the colour, make and a link to the Ciate website.

And so my addiction began!!! 

Before I knew it, I'd ordered the Mini Mani Manor (a nail polish advent calendar - which was reduced because it was January!!!) and a Nail Lab complete with polishes, glitter, sequins and nail art tools!!! Fortunately it's my birthday in January, so my birthday list very quickly became loaded with various nail art must haves!!!

Claire was a great help in the first couple of months - I tried to limit my questions to 2 or 3 a day, but I sometimes bombarded her with more!!!! She encouraged me to set up a blog and join various different challenges, which is how I came to be involved the A-Z challenge. 

This week is "X is for eXtra special" and I've struggled with how to interpret this for the last couple of weeks. It was only yesterday that it came to me - I decided to recreate Claire's mani that started my nail art addiction.


The mani is created using star decals in Rimmel "Blueberry Whizz" and China Glaze "I'd Melt for You" (these aren't the colours Claire used, but they were the closest I had in my stash!!) The stars are prepared in advance by painting polish onto cellophane, allowing it to dry and using a craft punch to create the stars. Next comes the tricky part where you have to separate the polish from the cellophane. The stars are then ready to be placed over the Power Dressing mani and set in place with a top coat of Glisten and Glow HK Girl.


My nails aren't as long and lovely as Claire's ( I could only fit 2 not 3 stars on mine!!!), I don't have a light box (yet!!!) and this pic is taken on my I phone, but I hope you can see some resemblance between the two manis!!!

X is for eXtra special which is how I view this polish from Ciate - Power Dressing - how it all started!!!

Xoxo

Monday 20 April 2015

Baby Shower or Pamper Day???

So, last Friday I was lucky enough to be invited to a baby shower with a difference!!. If you've read my blog recently, you will know that I am friends with Laura Hamilton, presenter of A Place in the Sun (amongst other things!!) Laura's second child is due at the beginning of May, and she decided to throw a baby shower with a difference, in support of Dreams Come True Charity.


Laura doesn't know whether she's having a boy or a girl, so I decided to create a generic baby shower mani using Ciate Strawberry Milkshake and Feeris Wheel - my other hand was the reverse of this one. The idea for the balloon on my thumb came from the charity logo.


The baby shower was held at Sketch London and was described as a luxurious afternoon of expert tea tasting, pampering and Celebrity Chef Cakes - and that is exactly what we got!!!


I need one of these at home, as fast as we were eating the delicious offerings, they were replaced - it was like everlasting afternoon tea -Yummy!!!


The Baby Shower was covered by Hello Magazine and Laura donated her fee to the Dreams Come True Charity. This photo was one that got left on the cutting room floor - but it was good enough for my Blog!!!


In addition to the lovely afternoon tea, Laura had organised an afternoon of pampering for her guests including, manicures or pedicures, lava shell massage and hand massage - it was pure heaven!!!


Laura had lots of her celebrity friends there, and I did manage to take a sneaky pic of Sinitta, without looking too star struck!!!


Sketch was an amazing venue for the Baby Shower and even visiting the ladies powder room was an experience!!! The toilet cubicles were like giant eggs, and once inside there were farmyard noises playing!!! It was the most surreal visit to the bathroom ever, but it did make me smile!!


We finished the afternoon with yet more cake and a glass of champagne (it would have been rude to say no!!!) and every guest was given a fantastic goody bag as they left.

Thanks Laura for a truly fantastic afternoon but it has left me wondering if I attended a Baby Shower or a Pamper Day???

Xoxo


Friday 17 April 2015

Dad - I miss you Pops!!!

So, today it is exactly 2 years since my wonderful, kind, generous, brave and amazing Dad lost his five year battle with Lung Cancer and passed away at the age of 69.

There's not a day goes by that I don't think about or talk about him and I miss him terribly.


I love this photo of Dad, it was taken at my sisters 40th Birthday party, and despite being really poorly, he still managed to put that cheeky smile on his face. The original photo had my Mum and Aunty in it, but I cropped them out (sorry!!!) and have had it as my screen saver ever since - so I get to see Dad (well his photo!) many many times every day!!


Another daily reminder I have of Dad is his wedding ring. He always wore 2 rings, his wedding ring and a signet ring with his initials on it. My sister wears the signet ring on a necklace and I decided to have Dad's wedding ring made into a ring I could wear everyday. When I took it to Bruce Smith Jewellers in Purley, Bruce advised me not to have it melted down and re-made, as it would become just a lump of gold. Instead, he made the original ring smaller to fit my finger and narrower (the original band was almost double the width but he managed to keep the original hallmark inside the band) and with the gold that he'd removed, he made a heart that attached to the band. I was thrilled with the end result and I wear it every day. I regularly get comments about it and I love telling the story of how it came to be!!!


Dad's favourite colours were purple and burgundy, and he would often be seen sporting a jumper in various shades of these colours.This pic was taken on my 40th Birthday!!!


 I wrote a poem to put on his flowers (mine were the heart shaped ones on the left) 

Dad

Our love for you will never fade,
With God, your body we must trade,
Our memories though, we'll keep those here,
To treasure and cherish each day of the year,
A wonderful Dad and Papa too,
Night night, sleep tight, God bless you x


My nails today had to be purple or burgundy and involve hearts. I've taken a different hand shot to normal so that my ring is in the pic!!!

2 years have flown by, it seems like only yesterday that Dad was here with us and yet so much has happened that he has missed. Not a day goes by though where I don't think about him and miss him.

Dad - I miss you Pops!!!

Xoxo

Friday 10 April 2015

Tweezers are a thing of the past!!!

So, having read the title of this post, you may be slightly concerned that I am about to let my eyebrows become overgrown caterpillars!!!. But fear not, I'm not about to throw my trusty tweezers away - I just won't be needing them anymore when it comes to placing gems or studs on my nails!!

I haven't been doing my nails for very long (about 3 months) but in that time I have done nearly 90 manis (that's nearly one a day!!!). Many of these manis feature some sort of nail adornment, a stud, a Swarovski crystal, a pearl or a glequin and this week is no exception


This mani was created for this weeks A-Z challenge where V is for Valuable. As you can see from the photo, this involved placing 20 gems on my nails that I had just painted with Rimmel London Frankie My Dear.

Whilst I love how a mani looks once the gems are in place, getting there can sometimes be a challenge!!!

First there's the issue with actually picking the gem up with the tweezers - this can be very hit and miss for me and several gems have pinged out of the tweezers grip, never to be seen again!!! 

Next is the issue of placing the gems - either directly onto the freshly top coated nail or using nail glue. Either method works well for me for the first few gems but inevitably after 2 or 3, the tweezers get a bit of top coat or glue on them, become sticky and once I've  picked up the gem with the tweezers, it doesn't want to leave them and it sticks to the tweezers rather than my nails!!!

Finally, there's the issue of putting any unused gems back in their container - this too can prove tricky (especially when you've just done your nails!!!)


These issues are now a thing of the past (along with my nailart tweezers!!) thanks to a simple tool I purchased during my last visit to Sally's. It's called a Sticky Picky and is made by Beauty Secrets. Sally's had cleverly placed it by the till area where it caught my eye. I hadn't gone in there to buy it (I didn't even know such a thing existed!!) but then I often find that I leave Sally's having purchased far more than I intended - I just can't help myself!!!


It's a really simple tool, with a small blob of sticky silicone at the end, that allows you to pick up a gem and accurately place it on the nail, without the need for glue. Amazing, no misplaced gems, no sticky tweezers and a quick and easy way to put the gems back in their container afterwards with no danger of damaging your mani. 

The silicone blob can be washed in water and left to air dry to regain it's stickiness when needed and it has a sparkly lid (I love a bit of glitter!!) to protect the tip when not in use.


I know that this sticky picker is going to see a lot of action and will be an essential part of my nail art kit - and where nail gems are concerned - Tweezers are a thing of the past!!!

Xoxo

Wednesday 8 April 2015

Essie Resort Collection 2015

So, those of you who read my blog regularly, will know that I recently experienced my first Professional Beauty Show at Excel London. Amongst the many polishes and goodies that I bought that day were these gorgeous polishes.


They are Essie, a brand which I'd never tried before, despite it being readily available in retailers. The colours shown are from the Resort Collection 2015 - and when the colours are as amazing as this, it would be rude not to buy all four!!!
From left to right the shades are Cocoa Karma, Suite Retreat, Time for Me Time and Stones n Roses. 

The polish is quite "runny", so you need to make sure there's not too much on the brush, this avoids it pooling in the cuticle area. Once I'd realised this, it made application so much easier and far less messy (with very little need for a clean up around the cuticles). Having relatively small nail beds, I loved the small brush which also made application easier for me. I'll definitely be buying more of this brand!!!

I decided to see if the polish would lend itself to Watermarbling. This is a technique that is very hit and miss for me but having watched yet another tutorial on the Starburst method - I decided to give it a go!!!


I'm pleased to announce that the polishes behaved themselves beautifully and I was able to create the starburst pattern relatively easily (in Watermarbling terms that means it only took me 4 attempts - that's pretty much a record for me!!!)

I only did one nail, due to time restraints (also known as the children being off school!!!) and  I painted the rest of my nails with Suite Retreat.

I then decided to add the rest of the colours in the collection using a basic dotticure.


I loved how this looked, but then started wondering how different it would be if I'd used a different base colour (just as well I've got two hands!!!)


Exactly the same colours and exactly the same technique I just switched the base colour to Time for Me Time. I was amazed at how different the mani looked just by switching the base colour. This gave me an idea - I went back to my left hand (the one with the accent water marble) and changed the colour of the other nails.


Time for Me Time


Stones n Roses


Cocoa Karma

I think on reflection I made the right choice with my first mani using Suite Retreat - 6 very different looks using the Essie Resort Collection 2015

Xoxo

Wednesday 1 April 2015

U is for Unusual


So, this week has turned out to be a week of unusual manis - not only are we on U is for Unusual as the prompt for this weeks A-Z challenge - but some of my other manis have been pretty unusual for me too!!!

This prompt had me stumped at first - I really couldn't think of what to create - I got my inspiration whilst taking my son to football practice - Mum's taxi service!!!  The boys were playing a game where they had to pick a make of car and then count how many they saw. That's when it came to me - why not put car logos on my nails - that would be unusual right?


Not only was it unusual, it was quite tricky trying to get the logo onto my little nail beds!! Just in case you can't recognise them from thumb to pinky it's Mini (my current car), Audi (my husbands car), VW (reminds me of when VW owners were getting their car logos stolen do that Run DMC fans could wear them on a chain round their necks - I'm showing my age right???) BMW (Tom chose this in the game!!!) and Mercedes (Josh chose this in the game!!)

I've taken part in several challenges over the last couple of months - one of which was @clairestelle8challenge which I really enjoyed. I was really pleased when I saw the post to say she was doing another challenge for April. The prompts are every 3-4 days, so quite manageable, and the first prompt was Black and White. Living in a house full of Fulham Football Fans it seemed obvious how I should interpret the prompt.


So here is my next unusual mani - FFC mani - for the first time ever my boys showed a huge interest in my nail art - yippee!!!

Seasonal events such a Halloween, Christmas, Valentines Day all provide great nailart opportunities and Easter is no exception - so this week I have created some Unusual Easter Manis


I love how this one turned out - unfortunately the Creme eggs all got eaten before I got a chance to take the photo so I had to cut up the Easter Egg box (much to Josh's annoyance!!!) - weirdly I kept wanting to lick them!!!


Still on the Easter theme, and with Good Friday in mind, I decided to create hot cross buns on my nails!!! Think it was a bit ambitious and the result was not as effective as my Creme egg ones - but another Unusual mani created!!!

As you can probably imagine, none of these manis stayed on my fingers for very long, but I had great fun creating them. Think they would all qualify for U is for Unusual!!!

Xoxo