Popular posts

Thursday, 26 February 2015

Patchwork Pinkies!!!

So, if you've been ready my blog this week you will know that my week started with a trip to the Professional Beauty Show at Excel. It was like being a "kid in a candy store" - so many gorgeous polishes/lacquers to choose from - I was in nail heaven!!!

The very first stand I visited was a nail brand I was unfamiliar with - Nubar. I got talking to the lovely Amy French (who turned out to be the Marketing Manager) and before long had made my first purchase of the day. 


It's a top coat that cures in the air (with no need for any kind of lamp) to give a 7 day finish to any mani (not that mine ever stay on my fingers for that long - I'm always eager to get on with the next mani) It was for that reason that I decided against the purchase - but then Amy mentioned it had sold so well the previous day that there were only 9 bottles left and sure enough there were 9 little bottles lined up on the display!!! Well, that was the top coat sold, after all, I couldn't risk coming back later to find I'd missed out (FOMO is something I suffer from - Fear of Missing Out!!!)

So the days purchases had begun and after 5 hours of pure bliss and lots of purchasing,  I returned to the Palms Extra girls and purchased a few coloured Nubar lacquers so that I could try the brand (after all it would be rude not to!!)


The first one I tridd on Tuesday night, was a sparkly Jelly-like laquer called Sugar. It was very sheer as I applied it and took several coats to build up the colour, but I was really pleased with the finished mani (even my Mum liked it, which is praise indeed!!) I posted a pic on Instagram and on my Facebook page and was delighted to get a repost from @nubaruk - my first ever repost!!!! They also liked my Facebook page, so I decided to do my next mani using some more of the polishes I purchased.


I selected 3 colours (L to R) Erratic Purple, Cool Whispers and Gloss and created some decals by painting onto cellophane. Once it had dried properly (I hate the waiting part!!!) I peeled the cellophane away and cut the decals into small shapes. I then placed the shapes, in a patchwork design on my nails and used a fine brush and black polish to create the stitches!! 


I took the inspiration from one of my Nail Facebook friends, Tracey Bellew, and was really pleased with the result. 

Another nail technique attempted - patchwork pinkies!!!!

Xoxo

Wednesday, 25 February 2015

"P is for Pale"

So it's Thursday again already and that can only mean it A-Z challenge posting day!!! This week we are up to the letter P and our challenge was "P is for Pale"

Unlike last weeks challenge , "O is for Old", I didn't have any problem coming up with ideas for this challenge , so many in fact I did a different look on each nail - a kitchen sink mani (I joined the A-Z challenge at L is for Lines so missed out on posting K is for Kitchen Sink!!!)


I loved this mani , not only because I was pleased with the outcome, but because I was able to use so many different techniques to create it!!!

I used my Konad double ended stamper and stamping plate M57 for my index finger,  SmArtNails nail art stencils for my middle finger, one of my new fine detail brushes for the freehand bow on my ring finger, and nail vinyls for my pinky. Although you can't really see it on my thumb, I also got to use my new China Glaze Fairy Dust (which I have a feeling is going to make many appearances in my manis as it is so gorgeous!!!)

Think this fits the bill for "P is for Pale!!!" 

Xoxo

Polishes used in this mani

Glisten & Glow - Stuck on Blu basecoat
Opi - You better Pink
Ciate - Amazing Gracie
Konad - White
China Glaze - Fairy Dust
Glisten & Glow - HK Girl top coat

All the Fun of the Fair!!!


So, I've just joined another Facebook group, Marbled Manicures, that has been set up by Tracey Bellew, a site offering hints and tips for those who find water marbling difficult - and I definitely fall into that category!!!

Having tried to water marble several times and having failed miserably (usually only ending up with one semi decent nail) I decided to try doing it a different - less messy - way.

With lots of new polishes to try, I decided on 4 of the new Leighton Denny polishes from the Funfair Collection 


The colours are part of a collection of 6 polishes, but I chose these ones as the multicoloured polish Loop the Loop, is a combination of the other 3 (L to R), Ticket to Thrill, Kiss Me Quick and Love on the Carousel

I started the Watermarble in the usual way and did 3 different bowls - the polish behaved really differently in each bowl - it's no wonder my watermarbles are so hit & miss!!!


You won't be surprised to know that I discarded the one in the top right bowl but the other two I persevered with. 

Those of you familiar with watermarbling will know that it is from this point that things can go horribly wrong and you can end up with a gloopy mess - not only on your nails but all the way down to your knuckles in some cases!!! It's then a mammoth task to clean up!!!

But no more dunking my fingers and hoping for the best - instead I went and cooked dinner!!! I left the bowls with the patterns floating on the surface for about half an hour. I've got to say, I was really tempted to go back to them sooner but I'm beginning to learn that my impatience leads to me having to reach for the acetone and start all over again!!!
 
When I was sure the polish had dried I used tweezers to remove the patterns from the bowls and laid them on some cellophane (an old cellophane from a greetings card) just to dry out completely.


I then had watermarble decals, all ready to put on my nails that had been prepped with 2 coats of Opi  Funny Bunny. I cut sections of the decals, placed them on 3 of my nails and then applied an Opi top coat. I painted my ring finger nail with Loop the Loop, as an accent nail. 


I have to say, this is by far the most succesful watermarble I've done and there was no messy clean up. This will be my method of choice from now on and the technique no longer fill me with dread!!!

All the Fun of the Fair (with no messy clean up!!!)

Xoxo

Tuesday, 24 February 2015

Cinderella makes her debut!!

So, having visited the Professional Beauty Show at Excel yesterday, I got to see some great new spring polishes that have just been launched (or in some cases are about to be launched) Cinderella collections featured heavily - in readiness for the launch on 13th March 2015 of the new Disney Film "Cinderella" - and it would have been rude not to have made the odd purchase or two!!!

Can't wait to play with these!!!!

Morgan Taylor Cinderella Collection 
Left to right
Party at the Palace
If the Slipper Fits
Best Ball Gown Ever
Watch Your Step, Sister
Ella of a Girl
My Carriage Awaits

Leighton Denny - Welcome to the Funfair
(Launches 1st March 2015)
Left to Right
Ticket to Thrill
Kiss Me Quick
Loop the Loop
Love on the Carousel


Essie Resort Collection
Left to Right
Time for Me Time
Cocoa Karma
Stones n Roses
Suite Retreat

With all these gorgeous polishes (and lots of other goodies) to try out, it's "Sod's Law" that I broke a nail this morning - aaaaggghh!!!! Think it's known as "man down" in the nail community. 

With my 52 week challenge still to complete for this week, there was no alternative than for my very own Cinderella hand (the one that is always in the shadows and never gets photographed) to make an appearance!!!

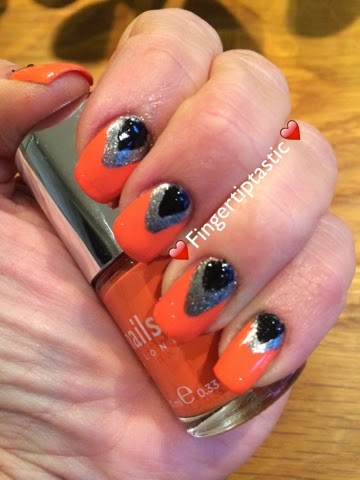
As always, this weeks challenge had 2 prompts - Red, Orange, Yellow and Houndstooth. I combined both prompts and came up with this!!


Despite it being my Cinderella hand in the photo, I was really pleased with how the mani turned out and I think it fits the bill quite well!!!
 
Cinderella Collections - Disney Cinderella - my Cinderella hand - Don't miss out on them!!!

Xoxo

Sunday, 22 February 2015

Third time lucky!!!

So, tomorrow is set to be an exciting day that I've been looking forward to for weeks - I'm off to the Professional Beauty Show at the Excel with my gorgeous cousin, Vicky and my nail guru, Claire from Kerruticles.

Vicky set up as a nail technician about 2 years ago after leaving her job as a mounted Police Sergeant - you couldn't get more opposite ends of the spectrum!!   She set up Lashious Nails and Beauty and is doing so well she's got a new therapist working for her!!!!


I hope I don't get asked any tricky technical questions!!!

Now, such a prestigious event calls for some pretty impressive nails so I've been planning my mani for the last couple of weeks. I was inspired by an Instagram pic from @banicured of a skyline at dusk but unfortunately it didn't turn out quite as planned :-(


It looked like I had several of those black & yellow ladybirds crawling over my nails!!! So despite having taken all morning to create the mani , out came the polish remover and I started again. 

I looked through some pics I've saved over the last few weeks of manis I'd  like to try and settled on a mani inspired by @polishedtwins, but again it just wasn't ticking the boxes!!!


So, having spent most of the day painting my nails and then removing it all,  I was now under pressure to create a mani I was proud of and get the roast beef dinner ready before 10pm!!!

I decided that recreating other peoples manis just wasn't working so I decided to use my latest purchase (oops, I wasn't supposed to be buying any more polish until after the show!!!).


China Glaze - It's in the Stars - the four polishes Liquid Leather, Sexy in the City, Reggae to Riches and Fairy Dust created this simple but effective mani - finally I'm happy with how my nails look - just as well as it's nearly bedtime!!!!

So did I choose the right mani to wear to the show??? Was it 3rd Time Lucky???

Xoxo

Wednesday, 18 February 2015

Blast from the Past - "O is for Old"

So this weeks A-Z challenge is "O is for Old" and I have found it really difficult to find inspiration for this Mani.

I started off by deciding I would use my "oldest" nail polish, Nails Inc St James, a bright red polish that I seem to remember getting as a free gift with a glossy mag that I bought at Gatwick Airport when going on holiday a few years ago. I love a free gift (who doesn't?) but I've never used it, I always found it a really hard colour to wear as it always seemed a bit too grown up!!!


I'm obviously more grown up now (or should that be I'm obviously getting old!!!) because I really liked how the mani looked, but as is often the case these days, I felt it needed something more. I rummaged through some of my recent additions to my stash and found that I had a silver Nicole by OPI texture polish (or crackle glaze as I would have called it back in the 80's!!!) 


It was perfect for this challenge - an OLD polish, topped with an OLD nail trend to create an OLD vintage looking mani. 

A real blast from the past!!! "O is for Old"

Xoxo

Polishes used in this mani

Nails Inc St James
Nicole by Opi Silver Texture

Omg - what's happened to me!!!

So a couple of strange things have happened to me recently and the only explanation for them is this nail bug that seems to have taken hold of me!!!

The first strange phenomenon that I have experienced over the last 5 weeks, is my inability to pass a shop that sells nail polish without purchasing. At the beginning of the year I had 6 very old polishes and 3 new ones that I had been bought for Christmas. I now have 153 in my stash and it seems to grow on a weekly basis. I have found myself in shops that I've never been in before (where everything is £1!!!) rummaging through the pots of polish looking for a bargain - my friends and family think I've lost the plot!!!

The second strange phenomenon is my inability to be happy with a plain mani. 


I did this mani on Monday. As it's half term, and the boys are at home, I didn't have much time to spend on it. I loved the colour Ciate She's Eclectic and loved the way it shimmered and almost changed colour in different lights (I think it's called a holo polish!!!) but throughout the day I kept feeling as though it needed something more. So whilst the boys were outside playing football, I reached for my Konad stamper and polish, and my Gals stamping plate GA37 


This was the result and I was far happier with the mani, albeit the stamping wasn't perfect, but I felt as though my nails were dressed properly - such a shame it all had to come off on Monday night ready for work on Tuesday. Whilst it is frustrating not being able to wear nail polish at work, the plus side is that I do get to try out lots of different looks on my days off!!!


This was how my nails looked last night after using another of my untried polishes (I have quite a lot of untrieds, as you can probably imagine) Again, a lovely colour Ciate Silhouette , but when I woke up this morning they just seemed to need something more.


So this was what I ended up with and I love how it looks. Think I need to accept that my manis will never again be plain and just one colour - OMG what's happened to me!!!

Xoxo

Polishes and other bits used in these manis

Ciate She's Eclectic
Konad Powdery Silver
Gals stamping plate GA37
Ciate Silhouette 
Ciate Sand Dune
Nailvinyls
Nazila rock n roll studs

Monday, 16 February 2015

A Tale of Two Manis

So, today I am going right back to basics with two Manis that I have created over the Valentines weekend. They are very different in many ways, but they do have one thing in common, they are both done without the use of any nail vinyls or stencils or stamping plates - just good old fashioned freehand (albeit very basic freehand!!!)


The first mani was my Valentine effort - what better way to celebrate Valentines day than with hearts and a couple of 
Nails Inc by Victoria Beckham polishes (champagne and flowers are soooo overrated!!!)
I decided to use both of the polishes from my boxed set (a Valentine pressie to myself!!) as they complement each other so well. Judo Red with Bamboo White hearts (and the reverse on my ring finger to mix it up a bit) 
The hearts were created using my Ciate dotting tool and brush and a lot of patience!!!
I love how the mani turned out and I got a lot of positive comments over the weekend.

By Sunday evening, having been wearing it for nearly 48 hours (a record for me!!!) I was over the whole heart thing and ready for my next look.

I am part of a Facebook group called Crumpets Nail Tarts, and have joined their 52 week Pick n Mix Challenge. We do weekly challenges that involve 2 prompts - one is a technique or style and the other is a colour combo - you can choose to do either one of the prompts or combine the two. This weeks prompts were Geometric and/or Blue, Green & Yellow. I have decided to try a create a mani using both prompts. 


It's not a look I would usually rock (and it definitely won't be staying on for 48 hours) but I think it meets the brief quite well.

I used 3 BarryM polishes, 2 of which, Road Rage (shown in the photo) and Stop the Clock, were launched on Wednesday as part of the new Speedy Quick Dry range. The third was Blueberry, one of the BarryM Gelly HiShines. If you look really closely you'll see that the lines are not as sharp as if I had used nail vinyls, but the theme of my manis this weekend was freehand!!! I used the dots to make the mani a bit more interesting and to hide some of the imperfections.

All in all, a successful weekend on the nails front - see you next time!!!

Xoxo

Thursday, 12 February 2015

Fifty Shades of ..... Watermarbling!!!!!

So, with the Fifty Shades of Grey Premiere showing in London as I write this blog, I thought it appropriate and fitting to make use of some of my Opi 50 shades of Grey polishes.


As you may know, if you've read my previous blog, I'm very new to all this - both the nails and the blogging - and I'm definitely at the beginner/novice stage.

I've had several previous attempts at Watermarbling - the technique that looks super-easy on YouTube tutorials but in reality seems nigh on impossible!!! After lots of bowls of water, untold drops of polish and almost a whole bottle of acetone I ended up with just one semi-decent nail :-(

Never one to be beaten, I've tried again and been ever so slightly more successful - I got something on every nail!!!


Unfortunately, my ring finger had a rather large area of the white undies showing, so I painted some free hand hearts to try and disguise the blunder - it is nearly Valentines Day after all!!!

I used some square studs , that I'd painted with Opi Romantically Involved to try and cover some other splodgy areas but I wasn't happy with how the mani looked - so out came the cotton wool and acetone AGAIN!!!

I couldn't bring myself to remove the whole lot, so I kept the ring finger as water marble and kept the others fairly simple


I think Water Marbling will remain my nemesis for a while to come but I'm going to try the dry method next time to see if I'm any more successful - watch this space (but don't hold your breath!!!!!)

Xoxo

Polishes used in this Mani

Opi Romantically Involved
Opi Embrace the Grey
Opi Cement the Deal
Opi Dark Side of the Mood
Opi My Silk Tie
Opi Alpine Snow 
Glisten and Glow HK Girl top coat
Glisten and Glow Stuck on Blu base coat

Wednesday, 11 February 2015

It's all about the "first"!!!

So this is my first ever blog and I don't have a clue what I'm doing!!!

I caught the nail bug about a month ago after being inspired by my friend Claire's  mani and her blog www.kerruticles.com

15 manis later, I've joined several Facebook groups, got involved in various challenges, followed loads of nail associated Instagram accounts and have now started a blog!!!

I'm not sure if anyone will be interested in anything I have to blog about or even read it, but if you've got as far as this - Thankyou!!!

The mani that I've chosen to blog about is my latest A-Z challenge - "N is for NEW".


I've used my NEW Konad double ended stamper, which incidentally behaved much better than the first stamper I used,  and a NEW Konad Stamping Plate M57. It was the first time I had tried decals so a NEW technique and I was pleasantly surprised and pleased with the results (not something I can say about my first attempt at Watermarbling - but that's a different story for a different blog!!!) 

The inspiration for the mani came from a post on Instagram from @selinarockell. 

The polishes I used were also NEW untrieds - Konad Black, Ciate Honey Bee, Ciate Mines a Mocha, Ciate Ladylike Luxe, W7 Black and BarryM Matte topcoat.


This was how my nails looked with just the decals in place - I tried to be all artistic with the scarf but think I'll stick to a basic pic in the future!!!

If I've managed to keep your attention, you've made it to the bottom of this blog and would like to see my other manis (a grand total of 10!!) you can view them on Instagram @fingertiptastic - and maybe even follow me :-)

Xoxo